
Process Improvement Tools.
Standard Work.
Work Instructions.
Flow Chart templates.
Swim Lane Cross Functional Flowchart.
Value Stream Mapping.
Lean tools.
Yamazumi Chart template.
Time Study templates.
DMAIC tools.
Quality Improvement tools.
House of Quality QFD.
FMEA Risk Reduction.
Root Cause Analysis tools.
Problem Solving tools.
OEE.
Preventive Maintenance.
Skip to main content


Working with Excel


Print


Installation and Setup
Installation - Each User. Installation - Multi-user. Language Translations. Personalize Your Templates.Systems2win Training.
Quick Start Initial Training. New User Training. Training Matrix. Systems2win Leadership. Training Classes.Lean Training
Lean Training and Coaching. Lean Principles. Muda 8 Wastes. Goal - Lean Flow. Roadmap - Lean Journey. Value Stream Mapping. Standard Work. Hansei Lean Thinking. Lean Dictionary. Online Lean Training. Lean Leadership.Microsoft Office Training
Excel Training. Excel Drawings (without Visio). Excel Charts. Word Training. PDF Training. Document Storage and Naming.Support
Support.Excel Training
Excel online training and videos to help you get the most from your Systems2win templates for process improvement for the most widely-used software in the world of business — Microsoft Excel
Don't read this like a book!!!
Use the
Table of Contents
and/or CTRL+F
to find keywords
Also see the training page for
Finding Help
How to find Help in the Systems2win website
1) To find web pages containing your desired keyword phrase...
Use Site Search
(found near the top of every Systems2win web page)
2) To find a keyword phrase within a page...
Use CTRL+F
How to find Help in a Systems2win template
Every time you begin with any new Systems2win tool...
The very first thing you should do is...
Start by reviewing the 'Sample' and 'Help' sheets, that have training for THAT template
If you ever 'get stuck' using Excel...
The 'Help' sheet in every Systems2win template has a section for
Excel Tips most valuable for using THIS template
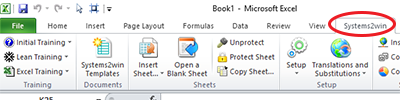
Systems2win menu
The Systems2win menu appears in the Ribbon bar whenever you open Excel with the Systems2win add-in installed.
If the menu isn't there... see FAQ
Systems2win menu features
to extend the functionality of Microsoft Excel
- Training
for Systems2win, Lean, and Excel
- Find and open your Systems2win templates
- Systems2win Templates — to find and open a workbook using ANY of your 150+ templates
including Word, PowerPoint, and PDF templates...
ALL templates are opened through this menu in Excel - Insert Sheet — to insert a sheet into any other workbook
- Systems2win Templates — to find and open a workbook using ANY of your 150+ templates
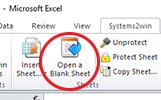
- Open a Blank Sheet
Click this button to open the worksheet where you will do your actual work.
And you can optionally click it again, to always have a fresh clean blank sheet.
- Unprotect or Protect Sheets
Protect Sheet button has special features to eliminate known bugs
- Copy Sheet
Copy Sheet button has special features to eliminate known bugs
- Setup
With special features to Sync your personalized templates (for Version Control)
- Translations and Substitutions
Switch languages between English, Spanish, Portuguese, French, German, or Chinese
and switch between Substitute Phrases (perhaps for different types of 5S criteria, or different header titles)
- Insert Link Icons
to provide visual and space-efficient hyperlinks to related documents
- Copy Shapes
to easily copy shapes to ANY Excel workbook
- Copy Chart
to easily copy a picture of a chart to ANY other document
- Objects
Easily view and select Objects and Hyperlinks
even if you have impaired vision, or are unable to use a mouse - Styles
to learn tips for how to better use Excel Styles
- Change Printer
to quickly switch between printers, plotters, and PDF writers
- Set or Reset Filter
to make Excel's Filter feature easier to use, and more mistake-proof
- Link Cells
to correctly handle linked cells with blank values
- Reset Gold Lines
to reset the size of the thin gold lines that keep your formula ranges intact
- Systems2win Portal
Self-Paced Excel Learning Quiz
Rather than reading this online Excel Training like a book...
you will learn a lot faster and better
when you use your 2LearnExcel template
Free Self-Paced Learning Quiz

- To quickly learn features of Microsoft Excel
that will be most common and helpful when using your Systems2win templates for process improvement. - To learn Systems2win's innovations
that make Excel even more useful. - When a learner 'brings it back green',
with one quick glance,
a leader can validate that a learner has learned
what they need to know about Excel
to 'not get stuck' using ANY Systems2win template.
"Although it took an hour and a half to complete the Learn Excel questions, I learned so much more from the interactive approach than from just reading the help text or viewing the short training videos. Right size, right time, right tools... simply inspires me to learn and do more."
~ Karyn Weimers, Lean Manufacturing Lead
URS Washington Division
Leverage your familiarity with Excel
Everything you learn from this free online Excel training,
you can use with anything you ever do with Microsoft Excel
and everything you already know about Excel,
you can use with your Systems2win templates
More links and videos to learn Excel
Systems2win's Excel training is intended to supplement (rather than replace) the excellent online help that comes with Microsoft Excel.
- Just press the F1 key to get Microsoft Help
- Lots of free 15-minute training videos: https://office.microsoft.com/en-us/training/
- Known Issues for different versions of Excel
Working with Excel
Workbooks and Worksheets
How to find and open your Systems2win templates
Alternative ways to find and open your Systems2win templates.
Where to save your working documents
Name, save, and organize your working documents in almost any way that best fits your needs.
Suggested policies for document storage and naming conventions.
To open a blank Template sheet
When you first open a Systems2win Excel template, it will open to the 'Help' sheet.
The 'Template' worksheet (where you will do your editing) is hidden.
After familiarizing yourself with the help on the Sample and Help sheets...
click the 'Open a Blank Sheet' button
which will open a fresh blank sheet —
which you will use as the starting point
for your working document.
Each template workbook contains a Template sheet
Yes, we know it can be confusing...
but it only takes a moment to 'get it'...
Each Systems2win Excel template workbook contains a hidden sheet named 'Template'.
When you click the 'Open a Blank Sheet' button, it copies (and unhides) a fresh blank copy of the Template sheet.
Benefits
- If and when you need another fresh blank sheet, simply click the button again
- With your Systems2win templates, you can never 'mess up your master sheet'.
A fresh blank master Template sheet is always available with the click of a button. - You can have unlimited worksheets in a single workbook.
For example, you might have an AsIs sheet, Future1, Future2, etc. - This button overcomes most known bugs in the traditional way of copying a sheet (see below)
To copy a sheet
Use the special Systems2win ‘Copy Sheet' utility
Systems2win menu > Copy Sheet
DO NOT USE Excel's usual way to copy a sheet
Usual way to copy a sheet —
(NOT recommended, because it has bugs)
Right-click the sheet tab, then select Move or Copy...
Check the 'Create a copy' checkbox.
Choose where you want to copy your new sheet.
Why use the Systems2win Copy Sheet utility?
Instead of the usual way to copy a sheet
Because it eliminates 5 Microsoft bugs
with the way that Microsoft Excel normally copies sheets
Tips for copying sheets
Quick Fix if you forgot to copy your sheet the right way
Copying a sheet to another workbook
How to prevent most copy sheet bugs
To Rename a sheet
Right-click the tab at the bottom of the sheet. Select Rename.
To Protect or Unprotect a sheet
Systems2win menu > Protect Sheet
Use this special Systems2win function to eliminate known bugs in the way that Microsoft normally protects sheets.
For older versions, you can simply use Microsoft's usual function...
Review tab > Protect Sheet
You can then optionally check boxes for what you want (and do not want) to protect
and you can optionally protect the sheet
Tip: Most Systems2win Excel templates are delivered unprotected. Some sheets are protected without a password, and can be easily unprotected.
To Unhide or Hide a worksheet
Home > Format > Hide & Unhide > Hide Sheet or Unhide Sheet
or... right-click the sheet tab (at the bottom of the page) > Unhide...
Several worksheets are usually hidden in most Systems2win templates:
- The sheet named 'Template'
(this is the sheet that gets copied when you click the button to Open a Blank Sheet)
- CLog (Customization Log)
- TT (for Translation Tables)
Caution: Never delete a Help or DV sheet, but you can hide them instead.
View, Share
Zoom
to make anything easier to read
View > Zoom
Excel Zoom bug
Shapes are sometimes zoomed to 100% when the rest of the page has a different zoom size.
Solution: View > Zoom > 100%
then View > Zoom > to any percent that you want.The shapes will now be sized correctly.
(This Microsoft bug doesn't happen often, and is easy to fix)
Screen Refresh
It is not uncommon for part of your display screen to disappear, or become distorted.
When this happens in Excel, you can't use the F5 key to refresh the screen (like you can in your web browser).
So you must either:
- Scroll down, then back up again, or...
- Switch to another worksheet or another window, then back again
Split Window or Freeze Panes
to always have column or row labels visible as you scroll
Position your cursor just to the right of the column, and just below the row,
where you want the panes to be frozen or split, then select...
View > Split or View > Freeze Panes
Document Author
The document Author is the only one authorized and responsible to edit the document.
Everyone else suggests ideas that are then accepted, rejected, or revised by the Author.
See online training for how to communicate with the document Author.
To save a document in PDF format
File > Print > select your PDF writer software
Why distribute documents in PDF format?
- Your Systems2win License Agreement:
Any document created using a licensed Systems2win template that is distributed outside of licensed users must be in a non-editable format, such as printed paper, an image file, or a PDF.
- Controlled documents (e.g. ISO 9000, FDA, or any other regulatory control...)
are usually not released in an editable format (such as Excel).
How?
Print Screen
To save a screen shot as an image file
Press the 'Print Screen' key on your keyboard (or ALT+Print Screen for just the active window)
Your screen shot is now copied to the clipboard.
Then Paste (CTRL+V) the screen shot into any application,
such as Word, PowerPoint, or any image editing software such as Photoshop,
or the free Paint that comes with Windows (Start > All Programs > Accessories > Paint).
To copy as picture
You can copy cells as a static picture
which then can be pasted into any document as a static image.
Highlight the cells that you wish to copy, then:
Home > Copy > Copy as Picture
For best results, choose the radio buttons for 'Appearance: As shown on screen' and 'Format: Picture'
Then paste (CTRL+V) the picture wherever you want it.
To paste into PowerPoint or Word
After selecting cells, and using regular Copy (CTRL+C)...
Experiment with the different options in Home tab > Paste > Paste Special
Tip: > Paste Special > Picture (Enhanced Metafile) will paste a non-editable snapshot of your selected Excel data
which will look exactly as it does in Excel (and this isn't always true when you use regular 'paste')
Personalize your Quick Access Toolbar
You will greatly improve your productivity when you personalize your work space to make your most frequently used menu items always instantly available.
Option 1) Right-click any command that appears in any Ribbon
and select Add to Quick Access Toolbar.
Option 2) On the far right of the Quick Access Toolbar
click the Customize Quick Access Toolbar symbol > More Commands
Extra credit: Notice that you have the option to Choose commands from: Commands not in the Ribbon
Add, Copy, Move
Excel Training Video
In this video, you will learn the single most important Excel skill you will ever learn — how to use 'Insert Copied Cells' to copy, and 'Insert Cut Cells' to move — rows or columns.
And you will learn how your Systems2win buttons make adding rows even easier.
And you will learn how to move ranges of cells less than entire rows or columns — avoiding the dangers of messing up formulas when you do.
Select entire rows or columns
(not just a few cells)
Hover your cursor over the gray edge of the sheet (where the row numbers or column letters are) until your cursor turns into a small black arrow.
Then hold down left mouse button and drag to select multiple rows or columns.
You will know you did it correctly when the entire range of rows or columns is shaded.
To avoid damaging formulas,
it is usually best to select entire (not partial) rows or columns
whenever you add, copy, move, or remove
Insert rows or columns
Look for button to Add Rows
Important Tip: Before inserting rows or columns, always first look at the right side of the Systems2win menu in the Excel Ribbon bar... to see if there is a special button to Add Rows, or Add Rows or Columns
If there is no special button...
If (and only if) there is no special button, then rather than using right-click > Insert,
it is almost always better to copy similar pre-formatted blank rows or columns
(thereby duplicating ALL formatting and formulas)
Use Insert Copied Cells.
Insert Copied Cells
This is probably the single most important Excel skill you will ever learn
- Select the range of cells to copy
To avoid damaging formulas... you will usually select entire rows or columns
- CTRL+C (or your favorite way of copying)
- Select the cell in the upper left corner of where you want to copy to
Or select the entire row just below where you want to copy to, or the entire column just to the right of where you want to copy to
Or you can select a range that exactly matches
the number of rows, columns, or cells that you copied - Right-click > Insert Copied Cells
or Home tab > Insert > Insert Copied Cells
or keyboard shortcut: CTRL+SHIFT++ (the plus sign)
Move
Same as Insert Copied Cells — but CTRL+X to cut (rather than CTRL+C to copy), and then Right-click > Insert Cut Cells (rather than Insert Copied Cells)
Extra Credit
More ways to Copy and Move
The most important Excel skill that you will ever learn is how to use 'Insert Copied Cells' and 'Insert Cut Cells' (as taught above.
For our many over-achievers... here are a few more optional ways to copy and move.
Shift Down and Copy
Does the same thing as 'Insert Copied Cells'
- Select the range of cells to copy
(perhaps the entire rows or columns) - Then in the workspace (not the gray edge of the worksheet where the row numbers and columns letters are)
hover your mouse over the edge of your blue highlighted cells, rows or columns until your mouse turns into a four-sided cross-arrows

(on a locked worksheet, the cursor will be a white arrow) - Right-click and drag
- When you release your right mouse button, select Shift Down and Copy or Shift Right and Copy
Copy cells (less than an entire row or column)
In addition to the methods taught above (Insert Copied Cells and Shift Down and Copy), here are a few more optional ways to copy cells that are less than an entire row or column.
Option 1) Copy (CTRL+C), then Paste (CTRL+V)
Simple copy (CTRL+C) and paste (CTRL+V) will work just fine IF (and only if)...
the source and destination color schemes, styles, formulas, data validation, cell comments, conditional formatting, and all other hidden elements are all identical
Option 2) Paste Special
Because hidden formulas and formatting are often not identical...
you will often want to use the options in the Paste Options dropdown
that appears right after you paste anything
or...
Right-click > Paste Special
or...
Home tab > Paste > Paste Special
Most often, you will select either Values, or Formulas, but why not experiment with them all? so that you know what's available when you need it
Tip: To paste Validation, the sheet must be unprotected
Video: The Pareto video teaches how to use Paste Special
Option 3) Copy & Drop
Highlight the cell(s) you want to copy.
Hover your mouse over the edge of the blue highlighted area until your cursor turns into a four-sided-cross arrows ![]()
(or a white arrow on a protected sheet)
Hold down the keyboard CTRL key as you hold down your left mouse button and drag.
When you release the left mouse button, your highlighted cells will be copied.
Tip: If you don't hold down the CTRL key, then your highlighted cells will be moved (rather than copied).
Move cells (less than an entire row or column)
Warning: It is easy to mess up formulas when moving cells less than an entire row or column. It is always a good idea to back up your file before moving cells.
Option 1) Insert Cut Cells
Same as Insert Copied Cells — (see the instructions above),
but CTRL+X to cut (rather than copy),
and then Insert Cut Cells (rather than Insert Copied Cells)
This is the single most important Excel skill you will ever learn. Learn it, and use it.
Option 2) Shift Down and Move
Same as Shift Down and Copy — but in the final step, select Shift Down and Move.
Option 3) Drag to move
- Select the cell(s)
- Hover your mouse over the edge of the selected cells until your cursor turns into a four-sided cross arrows
- Left-click and drag the cells
- Release the left mouse button
- Then go back to the cut cells, and perhaps apply styles formatting (or just copy a similar nearby cell)
Option 4) Cut and Paste
- Cut (CTRL+X)
- Either Paste (CTRL+V)
or often much safer...
Home tab > Paste > Paste Special > Values - Then go back to the cut cells, and perhaps apply styles formatting (or just copy a similar nearby cell)
Option 5) Copy, Paste, Delete
- Copy (CTRL+C)
- Either Paste (CTRL+V)
or often much safer...
Home tab > Paste > Paste Special > Values - Then go back to delete the unwanted data — using the keyboard Delete key
To Copy Visible Cells Only
After using Filter, if you use regular Copy & Paste,
it will copy & paste the hidden filtered cells, too.
To copy only visible cells,
select the filtered area that you want to copy,
then Home > Find & Select > Go To Special > Visible Cells Only
then use regular Copy
and when you Paste, you will usually want to use Paste Special > Values
To Transpose
between horizontal and vertical data
Copy (CTRL+C)
then select the top or rightmost cell in your destination range, then...
Home tab > Paste > Paste Special > Transpose
Delete or Hide
Tip: It is often better to hide rows and columns, rather than delete them.
You can always unhide them if you need them later.
Delete cells, rows or columns
Select the range of cells, (usually the entire rows or columns), then keyboard shortcut CTRL+– (the minus key)
or... Home tab > Delete cells
Select your desired radio button from the window that appears
Caution: It's usually better to
hide rows and columns, rather than delete
You can always unhide them if you need them later.
Caution: Home tab > Delete cells (or shortcut CTRL+–)
actually deletes the cells — and is very different from using the keyboard DELETE key, which will just delete the contents (while leaving the empty cells)
Delete just contents
Use the keyboard DELETE key
(The keyboard DELETE key is the shortcut for Home tab > Clear > Clear Contents)
This will delete the contents within cells (while leaving the empty cells).
Caution: The Delete key won't delete cell formats, but will delete any unprotected formulas
(so be careful to avoid accidentally deleting formulas).
Caution: Home tab > Delete cells actually deletes the cells,
and is very different from using the keyboard DELETE key, which will just delete the contents within cells (while leaving the empty cells).
Unhide rows or columns
Select the columns or rows surrounding the hidden ones, then right-click within your shaded selected area, and select Unhide.
Or Home tab > Format Cells > Hide & Unhide
Tip: Some Systems2win templates come with pre-formatted hidden rows and columns
(because it's easier to unhide rows or columns that already contain formatting and formulas)
Look for 'jumps' in row numbers or column letters
and then unhide.
Hide rows or columns
Select the columns or rows to hide, then right-click the selected area > Hide or Unhide.
or Home tab > Format > Hide & Unhide
Tip: It is often better to hide rows and columns, rather than delete them.
You can always unhide them if you need them later.
Training Videos to Hide Rows or Columns
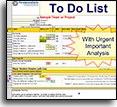
- Watch the To Do List training video
for a demonstration of how to hide rows and columns - Several templates feature the Hide/Show Rows button
that makes it even easier to quickly hide and unhide rowsYou can watch the Hide/Show Rows video
in the Value Stream Mapping training section
Editing and Formatting
The Formula Bar
Excel novices tend to do most of their editing in the cell itself,
and experienced Excel users do most of their editing in the Formula Bar (near the top of the Excel window).
Learning Exercise: Copy a few paragraphs from Word and paste them:
- directly into a cell
and notice that data was also overwritten in the cells below — which is probably not what you wanted
- into the formula bar
and notice that the 'paragraphs' are all correctly formatted within the single cell
Undo
Keyboard shortcut: CTRL+Z
Keyboard Shortcuts
Press the ALT key to see keyboard shortcuts.
And become familiar with the full list of available keyboard shortcuts:
https://shortcutworld.com/Excel/win/Microsoft-Excel_2016_Shortcuts
To enter a 'paragraph' within a cell
ALT+ENTER
Or within a formula (such as cells that link to the Translation Table...)
you can use CHAR(10) for a hard return between phrases.
Example: =VLOOKUP(6107,STC,4,FALSE)&CHAR(10)&VLOOKUP(6108,STC,4,FALSE)
Format Cells
Home tab > Cells (group) > Format > Format Cells (or right-click and select Format Cells)
Here you will find a large number of options for cell formatting, including:
number, alignment, font, border, fill, and protection
Styles
Home tab > Styles
To learn how to use Excel Styles for quick and easy cell formatting,
see the online training page for how to use Excel Styles.
Borders
Home tab > Font section > Borders
Tip: If you are having trouble keeping your borders consistent as you insert or move columns or rows, refer to tips to insert and move columns and rows.
To Merge cells
Home tab > Merge & Center > Merge Cells
Caution: You cannot change part of a merged cell — so it is not uncommon to need to unmerge, then re-merge cells if you need to insert, move, or delete rows or columns that intersect a merged cell.
Tip: If merging horizontal cells, consider using...
Home tab > Merge & Center > Merge & Center
Cell Comments
Right-click the cell, then select New Note
(Older versions of Excel used to be Insert Comment)
Tip: The training video for the To Do List template includes a demonstration of how to use Cell Comments
Tip: How to print Cell Comments at the bottom of the page.
Tip: When you resize or move columns, cell comments can change size — thereby hiding some or all of the comment text.
If this happens, right-click the cell and select Edit Comment.
Then pull the corners of the text box to resize it.
Tip: You can also add your own Cell Comments to supplement (not replace) the standard Systems2win pop-up help that appears when you click any row or column header (see animated image).
And your user-defined pop-up help will even be automatically found and transferred to your new templates each time you upgrade — if you follow the guidelines forhow to personalize your templates.
Data validation
Experiment with using...
Data > Data Validation
Tip: You might need to unprotect the sheet
In addition to its more traditional uses...
Systems2win uses Data Validation to create pop-up help messages that appear when someone clicks on a cell.
(see animated image)
How?
On the Settings tab > Allow any value. On the Input Message tab > enter your help message.
Tip: Rather than editing Systems2win's pop-up help, it is wiser to personalize your templates
with Cell Comments to supplement (rather than replace) Systems2win's standard help.
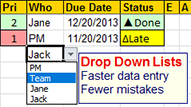
Dropdown lists
Benefits of Dropdown Lists
1) Faster, easier data entry
It's simply faster and easier to choose from a list —
rather than trying to remember your choices
2) Avoid typos and inconsistent terminology
If Jack calls it "soda" and Jill calls it "pop",
or someone simply makes a typing mistack, mistaek, mistake...
your lists won't Filter or Sort correctly
Any Systems2win template
that might benefit from using Excel's powerful Filter or Sort capabilities
will feature a DV sheet where you can personalize your dropdown lists.
Templates like the FMEA, Control Plan, Gantt Chart, To Do List, Training Matrix,8D Problem Solving, Leader Standard Work, and many more.
How to use a dropdown list
Click the dropdown arrow that appears in the right side of the cell, then select your choice from the dropdown list.
Once you learn how to use a dropdown list for ANY Systems2win template, you know how to use dropdown lists for all.
Video: How to use Excel Filter and dropdown lists
How to personalize your dropdown list
All dropdown lists are easily edited on your DV sheet.
Tip: There can't be any blanks in the middle of your Code lists.
You can even provide dropdown lists in multiple languages.
If you are personalizing your company's master template
(that everyone else uses as the starting point for their own working documents)
then your personalized dropdown lists will be automatically found and transferred to your new upgraded master template each time that you upgrade. Learn more.
Tip: Each workbook has its own Dropdown Lists. If your company's master lists have changed, then you can simply copy & paste them from the master template to your (older) working document.
How to add a new dropdown list to a data entry field
At the far right side of every 'DV' sheet, you will find 2 user-defined dropdown lists, and a textbox containing short instructions for how you can simply copy & paste either or both of the pre-defined cells to easily add a new dropdown list to any data entry fields where they might be useful.
Learning Review:
Personalize your own dropdown lists
Your leaders should have already personalized the DV sheet in your master template — so that you are starting with typical dropdown lists for YOUR company.
Now you can make additional changes for your own unique working document (if needed).
Try It
One good way to become familiar with this is to complete the Learning Exercises on the Sample sheet in your To Do List template.
Spell Check
Keyboard shortcut F7, or...
Review > Spelling
Spell check does not work in password-secured documents.
Tip: First try to simply unprotect. Some worksheets can be protected without a password.
Tip: For password protected worksheets — copy the text into an unprotected worksheet to check spelling.
Conditional Formatting
Conditional Formatting changes the format of a cell if the value of the cell meets certain conditions
For example, the background color might be red if the number is negative, or yellow if the cell contains the word 'Late'.
- Select cells to which you want to apply the conditional formatting.
- Home tab > Conditional Formatting
- If your condition is a formula...
Highlight Cells Rules > More Rules > Use a formula to determine which cells to format - Enter conditions
- Click the Format button and choose the type of formatting you want for cells that meet the conditions
Using International Symbols
for Conditional Formatting
To better support language translations,
conditional formatting in your Systems2win templates is based upon symbols (rather than English words)
For example, with less capable software,
a Status cell might turn green when you select the word 'Done' from the dropdown list, and turn yellow when you select the word 'Late'.
With your Systems2win templates,
conditional formatting is based on the symbol in front of the word.
So the same Status cell will turn green when you select either '▲Done' or '▲Hecho'
(or any other word in any other language — as long as the first character is the correct symbol).
Tip: Watch the training video for the To Do List template for a demonstration
of how to use numbers and symbols for conditional formatting
Tip: See known issues for conditional formatting in different versions of Excel.
Fill Series
Home tab > Editing (group) > Fill > Series
Experiment with this...
as a way to quickly populate cells with a logical extension of the values you type in the first few cells of the series.
For example:
you might type 1, 2, and 3 in your first 3 cells, then select Home tab > Fill > Series to quickly populate any number of cells with the numbers that follow.
Alternatively, you could select the 3 cells, then right-click to select the lower right corner of this selected area, drag down in that column as far as is needed, and this area will automatically be sequentially numbered down to the end of the range you have selected.
Or you might type 'January' and 'February' in the first cells, and it will automatically populate the next logical months.
Language translation
Systems2win Excel templates are available with language translation tables,
so that with the click of a button you can switch between languages.
Shrink to Fit
If text won't fit in a cell, you can either:
- Make the cell bigger
- Change cell format to Shrink to Fit
Home tab > Cells (group) > Format > Format Cells > Alignment > Shrink to fit
Hyperlinks and Data Links
How to use Link Icons for hyperlinks
Excel Ribbon bar > Systems2win tab > Insert Link Icon
Then, in the Link Icons window that appears,
Hover over any link icon to learn more about it,
then select the one you want to insert, and click OK.
Then right-click the Link Icon that you just inserted, and select Hyperlink
Important Tip: If 'Hyperlink' is greyed out, then you need to unprotect the sheet
(and be sure to reprotect the sheet after completing your hyperlink — to prevent accidentally damaging formulas as you continue working)
Then in the 'Edit Hyperlink' window, you can Link to:
any Existing File or Web Page or Place in This Document
(see the left column in the screenshot below)
Advanced Tip: Use the Screen Tip button
to add a message that appears when a mouse rolls over the icon
Video demonstration
To see a demonstration of how to use Link Icons, you can watch either of these Excel training videos:
How to link to a Web Page
Leaving the 'Edit Hyperlink' window open...
In your browser, open the target page, then in the browser Address Bar, copy the URL (so that there are no typos),
then return to this 'Edit Hyperlink' window (that you left open), and paste the URL in the 'Address' field.
How to link to an Existing File
Any type of file on your local computer or network
Leaving the 'Edit Hyperlink' window open...
In Windows File Explorer, browse to the folder containing your target document,
then right-click that target document, and select 'Copy As Path'
then return to this 'Edit Hyperlink' window (that you left open), and paste the copied path and filename into the 'Address' field
then delete the quote marks that surround the pasted path and filename.
How to link to a Place in This Document
Use the option to Link to: Place in This Document
(see the screen shot above)
and then select either:
- a worksheet (which will take you to the top of the worksheet)
- a range name (which will take you directly to the place within the page where you defined your range name)
Tip: Use the anchor Link Icon ![]() when linking to a Place in This Document
when linking to a Place in This Document
'Anchor' is the HTML term for 'a bookmark within page'
Bookmarks
Also known as 'anchors' or 'favorites'
Bookmarks allow you to go to a specific place within a page
The Systems2win website makes extensive use of bookmarks.
We make most of our bookmarks humanly visible —
so that your own internal technical support staff can send a link to the specific place within a page that has the answer to a question.
How?
Web page link
Simply append with the # symbol, followed by the name of the bookmark.
Example: Clicking https://www.systems2win.com/c/worksheets.htm#Bookmarks
will take you right back to where you are now
Tips: Bookmarks should not have spaces between words. Bookmarks are caps sensitive.
Computer File link
Append with #BookmarkName or #SheetName!A1
Hyperlinks in PDF's
See training for
How to make active hyperlinks in your PDF's
Formatting hyperlinks in cells
Avoid the ugly and dangerous
'sea of blue underlined text'
The problem
When the contents of a cell start with a hyperlink, Excel will automatically convert the entire cell into a "sea of blue underlined text".
This is not only ugly, but is also difficult to edit, and dangerously easy to click by mistake.
How to avoid this problem
Option 1) Don't start with a URL
If the URL is not the first thing in the cell, then it won't turn on the 'sea of blue underlined text', and the cell won't become one big active hyperlink.
Option 2) Change the default setting in Excel
File > Excel Options > Proofing > Auto-Correct Options > Auto-Format As You Type tab >
uncheck the box for Replace As You Type: Internet and Network Paths with Hyperlinks.
To select a cell containing a hyperlink
(without following the link)
Either:
- Hold down your left mouse button for a several seconds when selecting the cell, or...
- Select a nearby cell, and then use your arrow keys to select the cell containing the link
When you delete a cell that contained a hyperlink
When you delete the contents of a cell that contained a hyperlink, the cell format will sometimes still have the blue underlined hyperlink text format.
To restore the default cell format — copy and paste a similar blank cell.
When you delete a cell that contains a link icon
Before you delete a cell that contains ANY shape, you need to first delete all shapes before deleting the cells.
Otherwise the shapes will be collapsed and invisible, but will still be there — not deleted.
Tips to Avoid Broken Links
Absolute vs. Relative Links
- Relative links (specify the folderpath relationship between files)
How? Just browse and select the workbook
(or select the target cell or worksheet within the workbook)
- Absolute links (specify the full path)
How? Specify the full pathname
(e.g. starting with https:// or \\servername\)
Excel limitation
Excel does not allow you to specify an absolute link within your own computer or network. Links that start with a drive letter or server name always get converted to relative.
To avoid broken links
- The easiest way to avoid broken links...
is to store all related documents in the same folder
- Use a relative link if...
linking to another document that will always be in the same folder with this workbook
(or in a sub-folder that will always retain its position relative to folders containing other related documents — even if the entire folder is moved)
- Use an absolute link if...
linking to another document that will NOT always be in the same folder with this workbook
(or in a sub-folder that will always retain its position relative to folders containing other related documents — even if the entire folder is moved)
You cannot specify an absolute link within your own computer. Links that start with a local drive letter always get converted to relative.
Use your Document Storage and Naming template
See the online training for Document Storage and Naming to teach your users your ways to:
- Name files in ways that won't crash Excel
- Store related documents in ways that won't break incoming and outgoing links
- Save Drafts that aren't yet ready for release
- Save Obsolete archives in ways that won't break links
Link Cells / Link Data
Also known as data links, linked data, data roll up, rolled up data
How to auto-update cells with values from other cells
so that the data instantly changes in both places
Option 1)
- Copy the range that you want to link from (CTRL+C)
- Right-click the first cell of the range that you want to paste to
Paste Special > Paste Link button
Video: How to use
special features to
Insert Sheet, and Link Data
Option 2)
- Select the cell that you want to auto-update
(you want this cell's value linked to the value from another linked cell)
- In the formula bar, type the equal sign (=)
- Then simply click on the cell that you want to auto-update the value from
(which might even be in another workbook)
- Type the Enter key
The How to Personalize Text
video has a section that demonstrates
how to Link Cells
using Option 2
Correctly handle linked cells with blank values
Anyone that has ever used Excel's feature to auto-populate one cell with the value of another
(following the above instructions)
has encountered the problem that a cell linked to a cell that has a blank value
will give the incorrect result of '0' (zero)
rather than correctly mirroring the blank value of the original linked cell
This is a big problem...
because there are big differences between the way that an Excel chart handles a blank cell vs. a cell with a zero value
So Systems2win provides a special button to correctly handle linked cells with blank values
Here's how you use it:
- Follow the usual instructions to link cells
(above)
- Select your cells that have the links
- In the Systems2win menu, select More > Link Cells
Cautions to observe when Linking Cells
When using either of the optional ways to Link Cells, always observe these cautions:
- If you link to another workbook — then both workbooks will need to be opened together in order to avoid #REF reference errors.
- If your source worksheet uses scenarios — then your linked data will be correct ONLY when the source happens to be displaying the correct scenario.
- Follow the usual tips to avoid broken links
How to link data to a chart
Your chart might either be in a stand-alone workbook, or perhaps you used the Insert Sheet menu button to insert a chart sheet into any Excel workbook.
Perhaps a Run Chart, Pareto Chart, Histogram, Scatter Plot, or other types of Excel charts
- Populate the chart data with linked data
(following the instructions above)
Tip: To provide enough room for your existing and possible future data, you might need to add rows or columns on either the source or target worksheets - or both.
If so, then be sure to work within the thin gold lines that bound your data range, and remember that it is always wiser to use Insert Copied Cells, rather than just inserting rows or columns.
- Fix the linked cells to correctly handle blank values
(following the instructions above)
- That's it. Your chart will now instantly update every time that your data changes.
If you want a chart on the same sheet with the source data, then you can optionally simply copy and paste your chart to that sheet.
Both charts on both sheets will instantly update along with your source data.
How to link data to auto-populate a text box
- Select the text box.
- In the formula bar, type the equal sign (=)
- Then simply click on the cell that you want to auto-update the value from, and Enter
Caution: Formula Auditing shows only incoming links from cells — not text boxes
Switch between Absolute, Relative, and Mixed Cell References
A dollar sign ($) in a formula makes the cell reference absolute instead of relative.
Example:
Cell A1 contains the formula '=B3'
If you copy cell A1 and paste it to cell B2, then the formula in cell B2 will be '=C4'
In other words, the formula retains the relationship between the linked cells. It links to the cell that is 1 cell down and 2 cells to the right.
If cell A1 contains the formula '=$B$3',
then when you copy cell A1 and paste it to cell B2, the formula in cell B2 will be absolutely identical to the copied cell. It will be '=$B$3'
Use the F4 key to switch between reference possibilities.
As you type a reference into a formula, you can press the F4 key to cycle through the reference possibilities. Each time you press the F4 key the cell reference immediately to the left of your cursor will cycle between:
- $A$1 (absolute columns and row)
- $A1 (absolute column; relative row)
- A$1 (relative column; absolute row)
- A1 (relative column and row)
To link a range of cells
First copy the formula for one cell — as a relative reference.
Then copy the formula to the other cells in the range.
Then (optionally) convert all the cells to absolute references.
VC sheet (VC = version control)
A few Systems2win templates have a VC sheet, which uses linked cells for:
- Populating similar cells with similar data on multiple worksheets
- Easier integration with third party version control software
Concatenate Linked Cells
If you want a single cell to be auto-populated based on the values of multiple Linked Cells...
then you need to learn how to concatenate.
There are 2 ways to concatenate, and they both work equally well:
Option 1) Use amperstand (&)
Follow the instructions (above) for how to link to a single cell, and then in the formula bar, you can add an amperstand (&) followed by any other Excel formula,
most commonly perhaps:
- a link to another cell
- text (surrounded by double quotes)
Examples: =A1 & " " & A2
will display the contents of cells A1 and A2, with a space between them
A1 & CHAR(10) & A2
or
A1 & "
" & A2
Either one of the 2 examples above will display the contents of cells A1 and A2, as 2 "paragraphs"
For a "paragraph", you can either use CHAR(10)
or you can use ALT+ENTER as you enter text within double quotes
(The cell must be formatted to allow Word Wrap)
Option 2) Use the CONCATENATE function
Even though this command has been deprecated as a legacy function, it still works, and some users like it better.
Examples:
=CONCATENTATE (A1," ",A2)
will display the contents of cells A1 and A2, with a space between them
=CONCATENATE (A1,CHAR(10),A2)
or
=CONCATENATE (A1 & "
" & A2)
Either one of these 2 examples will display the contents of cells A1 and A2, as 2 "paragraphs"
Option 3) Use the TEXTJOIN function
If you happen to be using Excel 2019 or 365, then you also have the option to use the new TEXTJOIN function.
Example:
=TEXTJOIN (" ",TRUE,A1:A10)
will display the contents of all non-blank cells in the range A1:A10, with the values separated by a space. (or any other delimiter that you specify in double quotes)
Edit Links
Data > Edit Links
or for named cells...
Formula > Name Manager > Use In Formula
If your workbook contains unwanted links to external data, then you can use 'Edit Links' to redirect links to your current workbook.
Tip: Even though 'Edit Links' redirects all links on all worksheets in the workbook, it must be run from an unprotected sheet.
Tip: 'Edit Links' is all or nothing. It will attempt to redirect all links in the entire workbook. If there are a few that you want to keep linked to the external workbook, then you will need to manually recreate them.
Tip: Some links might not be able to be redirected to the current workbook. Broken links, links to worksheets that exist in the external workbook but do not exist in the current workbook, and some other situations will result in still having some external links even after using 'Edit Links'. When trying to track down remaining unwanted external links, be sure to also examine the named ranges.
Calculations
To avoid accidentally messing up formulas
- Keep your formulas separate from your data — by linking to and from cells in your 'Custom Formula Zone' (in the lower right quadrant of every Systems2win 'Template' worksheet)
- Rather than using Insert > Row, it is almost always wiser to copy a similar blank row (thereby also copying the formulas)
- Be especially careful when you move cells
- Highlight cells containing formulas
Highlight cells containing formulas
so that you don't accidentally delete your formulas
Option 1) It is sometimes a good idea to permanently highlight cells containing formulas
Use styles to permanently change the background color of cells containing formulas
Option 2) Use Excel's standard ways to identify cells that contain formulas
a) Unprotected cells that have a formula have a green corner
A green triangle in the upper left corner
b) Formula Auditing
Formula Auditing
Formulas > Formula Auditing
Experiment with the many standard Excel tools for formula auditing.
Tip: When using Trace Dependents —
if there are incoming links from other sheets, then you need to double-click the arrow to view the list of incoming links from other sheets.
This is especially useful in the TT Translations Table that has so many incoming links from other sheets
Tip: Formula Auditing only works with formulas in cells — not text boxes
If you accidentally delete a formula
- If you catch your mistake right away — simply Undo on the Quick Access toolbar (CTRL+Z)
- Later — you can often repair it simply by copying a similar cell.
How to define range Names
aka cell references, cell names, named range, local named range, global named range
A range is a cell or a group of cells.
On an unlocked worksheet... select your cell range.
Formulas > Define Name
Global vs. local names
By default, names are 'global' —
available to be used on every worksheet within the workbook.
To make a name 'local' to only one sheet —
precede the Name with the name of the worksheet and an exclamation mark.
Example: Template!MyName
Caution: Be careful not to delete or change any cell Names defined by Systems2win!
Technical support for troubleshooting custom formulas and/or accidentally-deleted Systems2win named variables is available at our regular billing rate. Always keep a backup before you start writing your own custom formulas and Names.
How to use the Name Box
to quickly select, highlight, and go to any Named Range
Simply use the dropdown list in the 'Name Box'
that you will find just to the left of the Formula Bar
in all versions of Excel.
How to use the Name Box to name a shape
ThinGoldLine or ResetThinGoldLines
How to keep formula ranges intact
Has this ever happened to you?
You insert or copy or move a new row to the bottom or top of a range of similar data cells . . .
and then notice (or worse — don't notice) that the new row is not included within your totals?
Ouch!
To avoid this painful problem
many Systems2win templates use a 'thin gold line'
above and below your range of cells, and then set your formulas to include the gold lines within the range.
Then whenever you insert, copy, or move new rows anywhere between the gold lines, you can be confident that the new rows will be included within the range.
Tip: Often there will be a thin gold line only at the bottom of a range
because you can include the (gold) header row as the top end of your range — accomplishing the same result.
Important: Format thin gold lines by applying the pre-formatted styles: 2winThinHorizontal and 2winThinVert.
If you simply change the background color, then Reset Thin Gold Lines, Filter, and Sort might not work correctly.
Reset Thin Gold Lines
Systems2win menu > More > Reset Gold Lines will:
- Automatically reset the width of thin gold lines
It automatically resizes any row or column containing any cell containing the styles 2winThinHorizontal or 2winThinVert
- Automatically populate every 2winThinVert cell
with hidden data
Thereby greatly increasing the probability that when you attempt to use Filter or Sort, they will simply magically work — even when a seemingly identical-looking table in your own homemade spreadsheet won't
Sometimes it can take over a minute to finish processing once you click 'Reset Thin Gold Lines'. Be patient.
Manual vs. Automatic Calculation
All Systems2win templates should be set to calculate automatically.
File > Options >Formulas > Workbook calculation > Automatic
Caution: Automatic vs. manual calculation can get changed inadvertently
because the first workbook that you open in Excel can change the calculation setting for all workbooks opened subsequently.
Recalculate
Formulas > Calculate Now
Or use keyboard commands...
F9
calculates the formulas in all open workbooks. To calculate the formulas in every worksheet of just one workbook, close all other workbooks.
SHIFT+F9
calculates only the formulas in the active worksheet. Other worksheets in the same workbook won't be recalculated.
CTRL+ALT+F9
calculates all formulas in all open workbooks, regardless of whether they have changed since last time or not.
CTRL+SHIFT+ALT+F9
rechecks dependent formulas, and then calculates all formulas in all open workbooks, regardless of whether they have changed since last time or not.
Precision
File > Options > Advanced > Set precision as displayed
In ALL Systems2win workbooks, this checkbox SHOULD NOT be checked.
Online help for all calculation functions
available in Excel
F1 > Function Reference
Analysis
Scenarios
Use Excel Scenarios Manager to store and quickly switch between different sets of data.
This is one of the most valuable features of Excel.
We highly recommend that you spend 2 minutes to learn it.
You will learn this better if you don't just read this — but actually follow along in Excel
Data tab > What-If Analysis > Scenario Manager
If Scenarios have already been defined...
Click the button to 'Show' the values for that scenario.
Tip: You might need to manually recalculate
CTRL+SHIFT+ALT+F9
Tip: If your original numbers have not yet been saved as their own Scenario, then you can restore those original numbers by using CTRL+Z to Undo
To create your first Scenario...
click the button to 'Add', then...
enter your Scenario name.
Click the icon in the right of the Changing cells text box, and then hold down the CTRL key while clicking the cells that you want to change in your scenario.
You can select up to 32 cells.
If you need to change more than 32 cells, then use one of the other methods described in our online training for Alternative Ways to Show Multiple Scenarios in one Document.
When you click OK...
enter values in the Scenario Values window.
And now you're ready
to switch between values with the click of a button
(Try doing THAT in Visio...)
Filter
Why?
Filter your data in useful ways —
displaying only those rows of data that meet your filter criteria.
Video: How to use Excel Filter and dropdown lists
How?
If you are filtering a document created from a Systems2win template...
then you can use this special feature that makes Filter really easy...
In the Systems2win menu in your Excel Ribbon bar,
select More > Set or Reset Filter
This will correctly set Excel's Filter to be ready to work
or (if it was already set), it will reset it... clearing any Filter choices that you chose previously.
That's it. Easy.
If you are filtering a non-Systems2win Excel document...
then you are going to need to search the Internet to ensure that you fully understand what Microsoft means when they say that you first need to select the correct cells in what they call a 'list'
and then you need to manually select the correct cells for your 'list'.
and then (with the correct cells for your 'list' selected)... you can then select...
Data tab > Filter
All versions... (next step)
Dropdown arrows will appear on each column header,
which you can use to filter your data
as shown in the picture below.
Click one of the filter arrows in the gold headers to see your filter choices
Filter and Sort Tips
- Dropdown lists greatly reduce typos
- Use Text Filters for AND/OR logic and Boolean operators such as 'greater than', 'begins with', 'does not contain', etc.
- If you need even more sophisticated filtering,
experiment with Data tab> Advanced Filter
- Do not use Filter to sort your data. Use Sort instead.
- Filter and Sort require a 'list'. Any Systems2win template that suggests to use Filter or Sort already has a pre-defined list named A_Filter_Data, and the correct cells for that 'list' will be automatically selected when you select Systems2win menu > More > Set or Reset Filter
Sort
Highlight ALL cells in your list
Include header titles in gold cells, and be sure to include ALL columns in your list — including thin gold vertical lines.
If your list has a Name, (such as A_FilterData), you can easily select it from the dropdown list in the Name Box
and then complete the information asked within Data > Sort.
Tip: It is a good idea to back up your file before sorting, and Undo (CTRL+Z) can be very useful.
Tip: Don't use Filter for sorting.
Tip: Some Systems2win templates might have disabled the Sort feature (because sorting might not normally make sense with that type of data)
Pivot Tables
Insert > Pivot Table
There is not a single Systems2win template that requires you to know how to use Pivot Tables.
If you already know how to use Excel's powerful Pivot Table features, however,
there is nothing preventing you from using them.
If you don't already know how to use Pivot Tables,
then you can learn about them using Excel's standard Help (CTRL+F1).
Charts
One of the huge benefits of being written in native Microsoft Excel
is the ability to add unlimited charts of almost any kind.
See training for Microsoft Excel Charts
Printing in Microsoft Excel
File > Print or CTRL+P
How to change the Print Area
to include only selected rows and columns within your Print Area
Highlight the cells that you want to include in your Print Area
Page Layout tab > Print Area > Set Print Area
Then Print (CTRL+P)
Or...
If you are viewing in View > Page Break Preview mode
then you can simply drag the thick blue borders to change your print area.
Also experiment with...
(and notice what changes in Print Preview)
- Freeze Panes or Split Window
- Hide columns or rows
- Resize column width to be 0.1
Home tab > Format Cells > Column Width - Resize row height to be 1
Home tab > Format Cells > Row Height
How to set Page Breaks
In View > Page Break Preview mode,
you can simply drag a dashed thick blue line to convert it into a solid thick blue line,
which is how you can manually specify where Excel will stop one page, and start printing the next.
To remove a manual page break,
just drag it to merge with the nearest manual page break
(or edge border).
This Video demonstrates
Page Break Preview, and how to set page breaks
Systems2win Print buttons
Print Areas
Some Systems2win templates have special features for printing different areas of a worksheet.
Things to know:
1) You can also use Excel's regular Print features
As delivered, Print Area 1 always corresponds to the primary Print Area for the main section of the template.
which gives you the ability to use everything you know about Excel to manually change the Print Area and change Print Settings in ways that are more flexible than the pre-sets for the Systems2win predefined Print Area 1.
2) The Print Area for Systems2win print buttons are defined using named ranges
and are therefore unaffected by any changes that you make to Excel's default Print_Area.
so the way to preview what will be printed is to print as a PDF.
3) You can select the Print Orientation for each Print Area
Somewhere on the sheet, you will find dropdown lists,
where you can choose for each Print Area: xlPortrait or xLandscape
4) You can print to PDF
How to change Print Settings
to print on a single page or multiple pages, etc.
Page Layout tab > click the tiny little arrow in the corner of the Page Setup section
Print Orientation
Portrait or landscape
Page Layout tab > Orientation
How to change paper size
(e.g. letter, legal, A series international sizes, CAD sizes...)
Page Layout tab > Size
Also see A3 Reporting, and How to change print scale (below)
How to change print scale
Page Layout tab > Scale
You can experiment with:
- Leave automatic
- Fit to specified number of pages wide and/or high
- Specify the % scale that looks best for your chosen paper size
To print cell comments
To print cell comments at the bottom of each printed page:
Page Layout tab > click the tiny little arrow in the corner of Page Setup section > Sheet tab > Comments > At end of sheet
Continuous Improvement
How to personalize your Systems2win templates
One huge advantage of being written in Word, Excel, and PowerPoint
is that your Systems2win templates are easy to personalize,
and Systems2win has invented several innovative ways to make it as easy as possible to personalize your Systems2win templates...
And... still make it easy to keep up with annual maintenance upgrades —
to make it as easy as possible to continuously improve your tools for continuous improvement.
Upgrade to the latest version
- What's new?
- Update your Systems2win Excel Add-in for free at any time
- Upgrade your Systems2win templates once a year
Contents